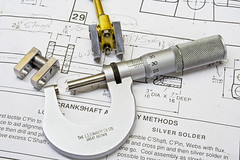
Micrometer and Crank webs
Click on any of the images
and you will go to my Flickr Site
for a bigger view
An Attempt to Help a Newcomer into Model Engineering
Model Engineering?
So what is model engineering? the answer will vary according to the person you are talking to.
So to explain what this section is about, I,I'm going to attempt a description of what the average Model Engineer might want as basic equipment and what he or she might use the equipment for.
Model Engineering is basically the same as normal mechanical engineering and most rules, processes and Safety Directions apply.
I don't wish this to be a long diatribe on Safety, but please ensure that you read and understand the safety instructions on all the equipment and tools that you might use.
Be aware that model engineering tools can cause major damage to yourself and others and in some cases even death.
Be careful out there.
![]()

Caught! Playing in the Workshop
A little bit about myself Engineering Wise
I served an apprenticeship as a Electro/Mechanical fitter at the Royal Naval Torpedo Factory in Scotland about 46 years ago where we spent some considerable time being taught hand fitting, filing, lathe work milling work etc.
I've also spent some years involved in engineering, and remember happy times at Bindon Engineering.
We machined all sorts at Bindon, but specialised in short batch machine work, a highly challenging area.
there was all sorts of machinery there from ancient Victorian Drilling machines to the latest state of the art CNC Lathes and Mills a mecca for anyone that enjoyed machining.
All my life I have been involved in model making, cars boats, planes so I never actually grew up :-) I opened and ran a model shop for some years B&G Hobbies which was fantastic fun but cost me a lot of money.
At present I am unable to work due to bad migraine attacks on a daily basis, so I work in the workshop on a sort of random basis in between migraine attacks.
So if you are following something, you might find that the info posted jumps around a bit, someday's I can't do any work, or sometimes I can only work on hand fitting and not use my machinery.
![]()
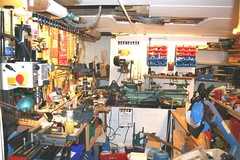
My Untidy Workshop
A Workshop?
Some people are lucky and have a great big well lit and spacious workshop, but it's amazing what you can pack into a small space if you really try.
My workshop is in the footings of our old victorian terrace, which were dug out by hand to provide the space for my tiny workshop.
I would like a bigger workshop, but I would just fill it up with more junk :-)
A garage or an outhouse, garden shed or other such space, can be turned into a workshop.
Any building or shed that is unheated or damp can play havoc with engineering tools so you need to think about getting around that with good ventilation, heating or oiling to protect your valuable tools.
Temperature change can be very bad for your tools as condensation will form on the cold metal surfaces, so having an unheated workshop, then going in and putting heating on for an hour will cause havoc.
If you can't have a constant heat, better to leave it cold and put a jacket on.
Paraffin or gas heaters do emit a lot of water vapour so I wouldn't recommend them for a workshop.
Having said all of the above, it's up to you and what you have and what you can afford.
I have seen a mini workshop kept in a cupboard in an alcove, where you opened the doors and everything opened out an amazing number of tools and stuff in there.
When you start keep things simple, one bench home made or bought once you get going you will get a feel for what you want.
Model Makers, Model Engineers, we are all different and want different things and arrangements, so really it's about what you want and/or what you need to produce whatever it is that you are going to make.
I'm not the tidiest person in the world so my workshop is always full of all sorts of projects, some of which are underway, some of which have been paused or stopped, whatever, it really doesn't matter.
If you are a neat tidy person, your workshop will be neat and tidy and probably best if you don't dwell on my chaotic workshop :-)
Remember a hobby is fun, don't make it into a chore.
I know of several people whose hobby is their workshop, they change and upgrade and modify all of the stuff in the workshop, and make tools and devices just for use in their workshop. There is no other output that isn't workshop related.
If that is what they want and what they enjoy, the workshop has achieved it's purpose.
I love polishing and highly detailed finishes, that doesn't make anything work any better, it might just look nicer.
Also I like the "doing" and not so interested in the finished product so I don't display anything I build or enter into competitions, the finished article is either given away or sold to fund the next project.
So what I'm trying to say in a long winded way, is anything goes, it's entirely up to you, just enjoy whatever it is you choose to do.
![]()
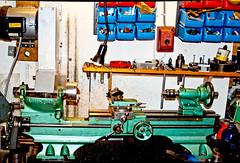
Myford 36" Gap Bed Lathe
Metal Working Lathe
Normally the first machine a Model Engineer will buy, apart from electric hand drills is a lathe.
There are many many lathes around of all sorts of sizes and shapes from the tiny Watch Makers lathe to industrial giants many meters long.
Most ME's (Model Engineers) plump for small/medium but practical lathes and here Myford are the premium manufacturers, but they come at a price.
The small Mini Lathes of chinese\Asian manufacture are excellent first lathes and are capable of very accurate and useful work.
There are variations in quality so be careful where you buy your lathe. Go for a well known name supplier as they can give advice and they carry the spares and supplies that you may need in the course of your machining.
There are also many second hand lathes on the market of various sizes and manufacturer. If you do decide to go down the second hand route, try to get someone with lathe experience to view the lathe before purchase.
A damaged or distorted lathe or one with damaged head bearing etc can be expensive to repair, and spares may not be available.
The lathe that I use is a very old and very rare 36", Gap Bed (gap bed is literally a gap in the front of the Lathe Bed, look in front of the chuck in the picture) Myford bought second hand as a rusty heap and a collection of rusty bits in boxes and cost me £15.
I re-furbished the whole lathe, a long and laborious job,(fun too) but it paid off and I now have a very useful machine, I also fitted a brand new variable speed electric motor from Newton Tesla this gives excellent control of speed under all conditions, without loss of power at the chuck.
I would not recommend this course of action to a beginner.
So really it's a question of what you can afford, and whether you will continue to use the purchased lathe.
What would I recommend:
If you can afford it and are determined to pursue Model Engineering go for a new myford, expect to pay £5000, to £6000+ for a shiny new lathe.
I can't afford one, (but I can dream), there is very little that you cannot do with these excellent machines.
Being practical the small Chinese/Asian Lathes are excellent value for money and can produce some good results, a much cheaper way to introduce yourself to the hobby.
There are many articles and references for these machines online, buy from a well known Company who can provide good back-up.
Some UK Companies in no particular order that supply Model Engineer Machinery:
Chester Chronos Warco Axminster Tools
All well known names that will provide good equipment and service.
![]()
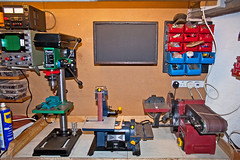
Pillar Drill and Linisher's
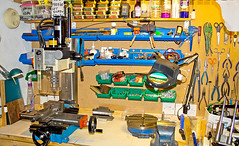
My Mini Mill Bench
Tidy for a New Project
I've bought a Lathe, What now?
First of all you need a solid bench to sit your new lathe on and preferably a tray to catch all the swarf and oil and general gunk.
Use oil drip trays under my lathe to catch the bits, you can buy or fabricate your own tray, maybe a garden tray or something like that.
The use of cheap vynil tiles as a covering for your bench can provide a cheap easy to clean (and replace) surface to work on. A quick spray with duck oil and a scrub with a nail brush will bring the tiles back to life clean and shiny.
The bench can be home made or a bought in version, or a combination of both.
Make the bench as robust as you can, it is going to receive "some stick" over the years, and will have to provide a firm base for existing and new machinery.
Start simple with one bench and add others (if you need them).
Add more benches when you have decided what variation/s of the hobby you wish to pursue, different things need different benches and allocation of space.
If you are anything like me, the variations are endless :-)
Remember to make thing easy to change, that way you can adapt to any new projects you might want to undertake.
Rubber mats make easy to clean and forgiving working surface and they are cheap to replace.
The rubber mat shown in the image "Tidy for a New Project" has square indentations about 1mm deep and is ideal for work involving small items as they get trapped and don't roll off the bench.
![]()
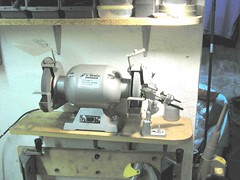
A Bench Grinder
Tools for your Lathe
A lot of new lathes come complete with a set of tools, most of the time you will only use one or two of these.
The tools you do use will need to be kept sharp and to achieve this you will need a Bench Grinder.
Bench Grinders are extremely useful in the workshop if used sensibly and with care.
You can use a linisher or a sander with Emery Belts to sharpen tools not so good as a grinder but useful in an emergency.
You can also use a diamond wheel in a drill or point holder such a a Dremel or similar, this is only useful for a final fine dressing or to restore a dulled edge.
There are many links on the Internet, about the use and safety when using a Bench Grinder.
Some links, there are many more on the Internet so have a browse:
Using a grinder ----- an advice sheet ------ Grinding Lathe tools------Lathe tool cutting Angle's
It can be useful to have several sizes of hand sharpening stones available just to give the edge of a tool a final polish, or to re-furbish a slightly blunt tool.
Don't get too wound up by cutting angles and differing types of metal unless you are going to do a lot of turning on a known type of metal.
I tend to have general purpose tools for everyday bits and pieces and only dedicate a tool to a particular task when really needed.
Some ME's do stick rigidly to tool angles and cutting speeds and feeds, which is fine for them as it's their way of enjoying the hobby others take a less formal approach and that's their way of enjoying the same hobby.
A lot of the information for tools is aimed at the commercial sector where cutting speeds and feeds are basically aimed at the fastest and cheapest way to achieve a finished piece of work.
ME's can take a more relaxed approach and enjoy the working of each part of the project in hand.
![]()
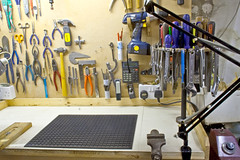
Hand Tools
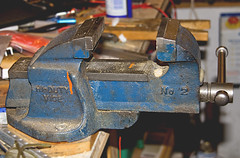
An Engineers vice. the best you can afford. (tip: the height of the vice on the bench should be such that the top part of the jaws are level with your elbow)
A hacksaw and a Junior Hacksaw with good quality blades.
A set of General purpose Files, buy the best files you can they last a long time and give a better finish.
A set of Swiss Files (the little ones with metal handles) again the best you can afford. Better to buy 3 or 4 good quality Swiss files than a pack of 10/20 cheap ones.
A scriber and a Scribing Block, or a Height Gauge.
A Flat thick piece of Glass, or a Surface Table.
Digital Calipers, the cheap ones are excellent value for money, but keep them away from oil, grease and water, if you don't want to worry about being oil and water tight buy the quality ones that are much more expensive.
![]()
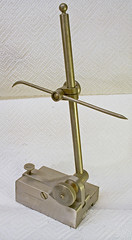
Scribing Block
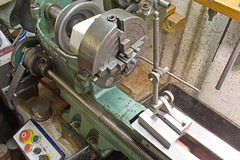
Checking for Center
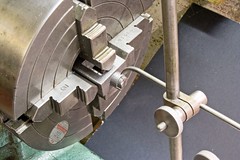
Checking for Center
Centering A Cylinder
Scribing Block
The scribing block is a very versatile tool, often made by apprentices as a work piece as there are quite a few operations required to finish the assembly.
The Scribing Block does what it says on the tin, you can scribe lines on work pieces.
The Block is much more versatile than that however, it can be used for checking the flatness of a piece of work, setting up work pieces in a four jaw chuck, checking for roundness or wobble of a work piece in a chuck.
Can be used to hold a Dial Gauge Indicator and as many things as your imagination can come up with.
In use the scribing block is coarsely adjusted by moving the column and arm, then fine tuning using the small knurled wheel on the base.
Be careful where you leave your scribing block as the sharp points have a habit of catching you out.
![]()
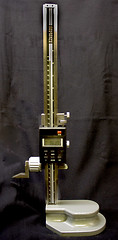
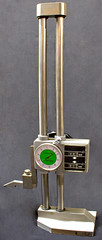
Height Gauges
Height Gauges
Height Gauges are versatile tools allowing much greater accuracy and ease when marking out a piece of work.
If you are buying a height gauge for the first time, I would recommend going for a digital display version, these are much easier to use and offer some handy functions when in use.
The digital height gauge has the facility to work in inches or millimeters at the press of a button.
![]()
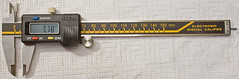
Digital Calipers
These can be obtained extremely cheaply and are surprisingly accurate, well worth purchasing before starting your projects.
Keep the cheap versions dry and free from oil - they are not waterproof and will suffer damage if allowed to get wet.
![]()
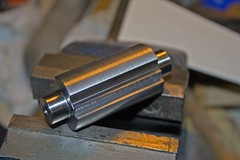
A Peanut Crusher Rotor
Are the things I make Good Enough
One of the questions that people ask, "is my stuff good enough".
Normally people who are starting out have bought a magazine which shows all sorts of wonderful models and creations, and are put off trying Model Engineering because of this.
It is wise to remember that these wonderful models/creations are often built by people that have the resources and the time to achieve such models whereas 99.99% of Model Engineers are happy to create simpler items for their own enjoyment and may well one day go on to create super models/creations of their own.
Many of the Model Engineering Publications seem to have lost touch with the everyday model engineer and tend to publish complex models built by a small number of very skilled model engineers who also write the articles and provide images so the magazine has a easy job for publication.
Lets be quite clear I personally admire and wonder at the beauty and work involved in these "super models", but they are not the stuff of the everyday model engineer.
Anyone who builds any project in metals or combinations of materials is a "model engineer", whether it is a steam engine, car project, IC engine, tools for the workshop, peanut crusher, clothes line retractor, whatever it all engineering.
If you are happy with the result of your toils then you have achieved your goal.
Even better is the idea that yes that construct was great, but if I did it again I would improve so and so, or do something different to improve it.
When mistakes are made, and we all do mistakes, instead of getting frustrated, and giving up, think about a way of doing the project or part again, avoiding mistakes that happened the first time.
Mistakes are just opportunities to improve :-))
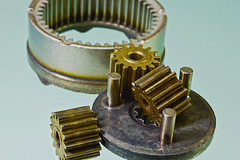
Epicyclic Gear Train
I Never Finish a Project
So what! if you have had pleasure in doing the bits that you have done, don't worry about it.
Do store the project somewhere safe as you may well want to finish it at sometime in the future.
I usually have several projects going at one time, some will be finished, some won't.
Just enjoy the bits that you want to enjoy, if a project has some boring bits, (and most do) then do them a little bit at a time, allocate a ten minute slot of workshop time, once you get started you will find the ten minutes becomes fifteen minutes then half an hour.
Always remember "It's a hobby for enjoyment" don't make it into a chore.

Work in Progress
This is a an ongoing project so keep an eye out for updates and additions